
PLACEMAT TUTORIAL
I'm so excited to share with you my first Tuesday's Tutorials post! And I'm especially excited that it's courtesy of the ever lovely Creative Kismet who so generously allowed me to share her tutorial . Regina is one of my favorite bloggers....always so generous and beautiful and uber creative. I have two of her prints and I love them!!!!!
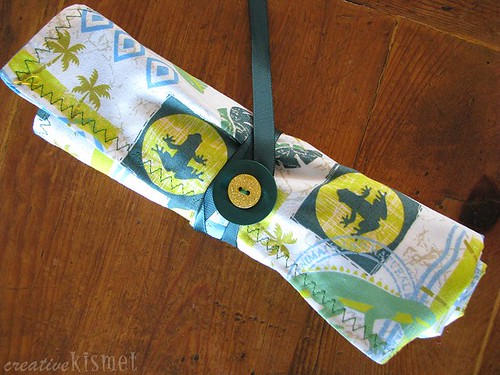
Regina loves to sew and loves to sew delightful things for her kiddos....I love these placemats she designed and think it would the perfect addition to Miss S's lunch box for school.
 Placemat #2 with Directions
Here’s what you’ll need to make your own:
2 ~ 14 x 17 inch pieces for the mat with 3/8 inch seam allowance.
2 ~ 3.5 x 6 inch pieces for the pocket with 1/4 inch seam allowance.
1 ~ 14 x 14 inch piece for the napkin with 1/4 inch double rolled hem.
1 large button
18 inch piece of ribbon, cord, tie, etc.
scissors, thread, sewing machine, rotary cutter, cutting mat
1. Cut and iron all pieces.
2. Take the two largest pieces, place right sides together and sew all around using a 3/8 inch seam allowance leaving a 4 inch gap. Clip corners, turn right side out, poke corners out and press flat. Sew zig-zag stitch all around the edges.
3. Take two pocket pieces, place right sides together and sew all around using a 1/4 inch seam allowance. Leave a 2 inch gap on the bottom short end. Clip corners, turn right side out, poking corners out, and press flat. Place pocket piece on placemat — right or left bottom corner about 1 inch awary from edge, or where-ever you would like it to be. Pin in place and sew around sides and bottom edge with a straight stitch leaving top edge open.
4.Fold and roll the mat up and pick a good place to attach the ribbon (I folded the top third of the mat down over the utensil pocket the rolled it up from the utensil side). Hand stitch one end of the ribbon in place then hand sew the button on top.
5. Make napkin using the above tutorial, sit down and enjoy a nice little lunch!
Thanks so much Regina!!!
 PS Don't forget - http://raeshadrz.blogspot.com/2010/04/project-postcard.html
1 comment:
Well done.
Post a Comment